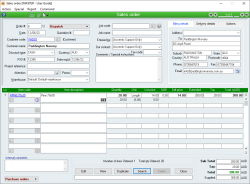
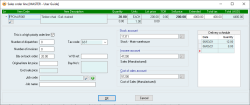
Sales order
A Sales order is the means by which you record the quantity and price of goods or services that you are going to supply to a Customer (Debtor), and the manner and date by which you supply them. The details of the goods and services and the conditions of sale listed on a Sales order are taken to have been accepted by the Customer to whom they are being provided.
You cannot create a Dispatch (delivery) without a Sales order.
A Sales order is referenced throughout the system by its Sales Order #.
Entire lines can be moved, cut, copied or pasted within a Sales quotation. See Sales order lines field manipulation for details.
- If the Sell price of any of the items is below its cost price (based on the current average cost for the selected Warehouse) you will be warned of this and asked if you want to continue with the update. If you select No, you will be returned to edit mode and no further action will be taken. If you select Yes, then the update will continue if you have Administrator permissions for Sales Orders, otherwise you will be prompted to enter an Administrator user code and password before you can continue
- If any of the order lines have a zero quantity, you will be asked if this is correct. If you select No, then no action will be taken and you will return to Edit mode and the cursor will be placed on the Quantity field that was zero.
- If the total of the Sales order exceeds the credit limit of the customer entered, you will be warned of this and asked if you wish to continue with the update. If you select No, you will be returned to edit mode and no further action will be taken. If you select Yes, then the update will continue
- The Quantity Committed for all stock items contained in any of the order lines will be increased to reflect the amount committed to this order
- You will be asked if you would like a printout of the Sales order
Accentis Enterprise will check the following locations in the order that they are listed. Whichever location yields an email address first is the email address used.
- The E-Mail address for all Contacts linked to the Customer who have Sales order ticked in the Manage function associations menu. (the report will email multiple addresses if more than one contact is linked).
- The Contact linked to the Attention field of the Sales order.
- The Customer's E-Mail address.
- The Email address linked to the Billing details tab of the Sales order.
The following keystrokes perform the stated action when activated from any of the editable fields (i.e. Item code, Description, Quantity, List Price, Discount, Sell Price) within an order line for a Sales quotation, Sales order or Purchase order.
- CTRL-Up: Move line down up place
- CTRL-Down: Move line down one place
- CTRL-PageUp: Move line up 1 page (6 places)
- CTRL-PageDown: Move line down 1 page (6 places)
- CTRL-Home: Make line the first line
- SHIFT-Home: Make the cursor to the first line
- CTRL-End: Make line the last line
- SHIFT-End: Move the cursor to the last line
- CTRL-+: Insert a blank line above the current line
- CTRL- -: Delete the current line
- CTRL-S: Cut line
- CTRL-D: Copy line
- CTRL-F: Paste line
The following keystrokes can only be activated from the item code field:
- SHIFT-Up: Change the itemcode to the previous (alphabetical) itemcode
- SHIFT-Down: Change the itemcode to the next (alphabetical) itemcode
- A Sales order can be automatically generated from the information on a Sales quotation, and can then be modified with no restrictions. The Sales order displays the original Sales quotation number from which it was generated.
- A warning is issued when an update is attempted on a Sales order whose Customer is on stop-credit or if the Sales order total is greater than the credit-limit of the customer
- A warning is issued if an update is attempted on a Sales order containing any items that are being sold at less than the current average cost + X%, where X is the specified Minimum markup threshold. If this warning arises, only a user with administrative permissions can update the Sales order
- A Purchase order to a Supplier can be automatically generated from the Items on a Sales order
- Pop up notifications available for Customers and Items
Module: Accounts receivable
Category: Sales Orders
Activation: Main > Accounts receivable > Sales order
Form style: Multiple instance, WYSIWYS, SODA
Special actions available for users with Administrator permissions:
- Edit the following restricted fields (uninvoiced orders only):
- Approve orders totalling over the Sales order limit for non-admin user value.
- Unapprove orders.
- Edit approved orders.
- Alter the User ID in the Entered by field.
- Bypass Minimum sales quantity checks for items.
- Update orders where the Sell price is less than the current Current Cost / Quantity Summary for the selected Warehouse.
- Change the User ID of the Entered by field of memos.
- Edit memos entered by other users.
Database rules:
- A Sales order cannot be given a date that is outside the range of the Extended financial year
- A Sales order cannot be deleted if its date is outside the range of the Extended financial year or before the Journal lock date
- A Sales order cannot be deleted if it is referenced by any of the following:
Reference: Number, Read-only, WYSIWYS
This number uniquely identifies a Sales order. The Order # is automatically generated by the system after the first update of a Sales order and cannot be changed for the life of the order.
If a Sales order is deleted, its Order # will never be used again for another Sales order.
Reference: Button
This field indicates whether the current Sales order has been fully or partly dispatched. It will only be visible for Sales orders that have at least one dispatch entered for them.
Clicking on the field will cause a menu to drop-down displaying all the dispatches relating to the current Sales order. Clicking on any of the displayed dispatches will then display the selected Dispatch record.
Reference: Yes/no
Information is under review for a new version and will be updated soon.
Reference: Date, Mandatory, QuickList, WYSIWYS
This is the date on which the Sales order was initiated. It can be any valid date that is within the current Extended financial year.
This is the Sales quotation number from which the Sales order was generated. If a Sales order is generated from a Sales quotation, then the Quote # field is filled in with the Sales Quotation # and can never be changed. If the Sales order is manually generated (not from a Quotation), then the Quote # field will be empty and cannot be changed.
If the Sales order was generated from a Sales enquiry, then this field will appear as Enquiry #.
This is the Sales enquiry number from which the Sales order was generated. If a Sales order is generated from a Sales enquiry, then the Enquiry # field is filled in with the Sales Enquiry # and can never be changed. If the Sales order is manually generated (not from an Enquiry), then the field will appear as Quotation #, will be empty, and cannot be changed.
Reference: Text(12), Mandatory, AutoComplete, QuickList, WYSIWYS
This is the code that represents the Customer (Debtor) to whom the Sales order relates. This field is an auto-complete field and must contain a valid Customer code before you can update the order. To display a list of all valid Customer Codes, click on the button or press the QuickList Hot Key.
If you change a Customer code while you already have order lines entered, you will be asked whether or not you want all of the prices for those items changed in accordance with the new Customer code / Discount type combination when you leave this field.
If the Customer selected is on stop-credit or is over their credit-limit you will be warned of this when you leave the field but you will still be able to complete the order.
If any lines on the Sales order have been Dispatched or Invoiced, you will not be able to change the Customer code. This will also be the case if a pre-payment receipt has been entered for Sales order you are currently editing.
Once a customer has been selected, either additional information about the customer is displayed on the Sales order. In the area to the right of the Customer code field, you have the choice of displaying either the Customer type, or the Credit Terms for the customer.
Reference Text, Read-only, WYSIWYS
This is the Customer name that relates to the Sales order and can only be changed by selecting a different Customer code.
Reference: Select from list, Mandatory, HotEdit, WYSIWYS
This is the Discount type that will be used in price calculations for items entered on the Sales order. This will initially default to the Discount type for the Customer you have selected, but you may be able to change it to another Discount type based on permissions and the value of the 'Allow non-admin users to manually override customer line prices ' option in the database setup.
If the Discount type is changed while you already have order lines entered, you will be asked whether or not you want all of the prices for those items changed in accordance with the new Customer code / Discount type combination.
Reference: Select from list, Mandatory, HotEdit, WYSIWYS
This is the currency in which the Sales order will be specified. This will default to the Currency for the Customer you have selected, and can not be modified.
If the currency is changed (by changing the Customer) while you already have lines entered, you will be warned that the prices will be changed in accordance with the new currency value.
Reference: Date, QuickList, WYSIWYS
Sales order ship date (also known as Confirmed Ship Date) is an optional hidden field that can be activated to allow you to enter the date on which the shipment of the goods to the customer has been confirmed.
This confirmation, may be a confirmation from the customer that they are happy to have the goods shipped on this date, or a confirmation internally that the goods can actually be shipped on this date.
This field can be activated by your Accentis Support team.
Comparing the Required Date and the Ship date or the Ship date and the actual Dispatch date/s can provide valuable insight into how you are meeting your customer’s requirements
Reference: Text(64), QuickList, WYSIWYS
This is the Customer’s sales representative for the Sales invoice. When a Customer is entered on to a Sales form, the contact selected for the Attention field is chosen alphabetically by the contact Role field followed by the Surname/Firstname. If you type a contact name in to this field and, on update, it matches one of the contacts listed for the customer, then this field will be linked to the contact and allow a hyperlink to the contact record (indicated by a blue underline on the field when in IDLE mode on the form).
You may click on the search button next to the Attention field to search for a contact.
Last edit: 26/05/20
Reference: Select from list, HotEdit, WYSIWYS
This is the promotion that attracted this sale. This field will only be visible if the 'Display promotion field for Sales quotations, Sales orders and Sales invoice ' option is set in the System Preference setup.
Reference: Select from list, Mandatory, HotEdit, WYSIWYS
This is the Warehouse for the Sales order, from which items will be dispatched.
If you have selected Allow warehouses to be set per line on Sales records, then this default warehouse can be overridden for each line where a different Warehouse has been specified in the Sales order line details.
When a Sales order is created, this field will be set to the Default sales warehouse in the PC Defaults tab. If there is none, this field will be set to the Default sales warehouse in the Accounts receivable tab.
Whenever a Customer is set, and the Customer has a Default warehouse, this field will change to the Customer's Default warehouse.
Last edit: 17/12/2025
Reference: Select from list, WYSIWYS
This is the Tax codes for the Sales order. This field will pre-fill with the selected Customer's tax code if one has been set, but can be changed as needed.
By default, lines on Sales quotes, orders, and invoices will use the tax code that has been allocated to the Item. Specifying a tax code using this field will pre-fill the tax code for each new line, and will override the tax code set for any existing line on that record. However, tax codes for each line can still be altered and can differ from the record-specific tax code if desired.
You may choose to use this for organisations that have region-based tax regimes (e.g. United States), and need a tax code / jurisdiction to default per customer. You would also use this for customers who are always tax exempt, or need to be set to a special tax code for any other reason. You can use keyboard shortcut F12 to manage this field.
If you don't need to use this for any specific reason, it's best to leave it empty and let the system enter the default values. Incorrect use can cause undesired effects, so only use it if you are sure you understand what its effects will be.
This field will only appear when Allow tax codes to be set on Customers and Sales records has been set in system preferences.
Last edit 26/02/24
Reference: Text(64), AutoComplete, QuickList, WYSIWYS
This is the default Job to which the Sales order relates, if any. If the Job entered does not exist, you will be prompted when you update the Sales order as to whether or not a Job having that code should be created. A Sales order does not have to have a Job, but if it does then all subsequent items added to the Sales order will be given the same job by default.
If the Job for a Sales order is changed to a value different to any of the Jobs for items specified for the Sales order, you will be asked whether to update Jobs for all items on the Sales order. Clicking yes to this question will set the Job for each item on the Sales order to the new Job.
To display a list of all valid Jobs, click on the button or press the QuickList Hot Key.
Reference: Select from list, Mandatory, HotEdit, WYSIWYS
This is the User name (not user login ID) of the user that created the Sales order. This is automatically filled with the User name of the current user and cannot be changed unless the user has Administrator permissions for Sales Orders.
Reference: Select from list, Mandatory, HotEdit, WYSIWYS
This is the User's name (not user login ID) of the user that has been assigned as the first point of contact for enquiries regarding the Sales order. This does not have to be the same as the user that created the Sales order and can be used as a method for analysing Sales Representative performance.
Reference: Memo, Expandable, WYSIWYS
These are any comments or special instructions relating to the Sales order that should be printed on the order. Any comments written here will be carried through to fill in the Comments field on a Dispatch that is created for the Sales order.
Reference: Memo, Expandable
These are any internal comments or instructions that are not intended to appear on printed material for external consumption, for internal eyes only.
Reference: Button
This drop-down button will only display when there is a Purchase order linked to the Sales order. It can be used to open the linked Purchase order. It will display information about the Purchase order when initially pressed.
Information that can be displayed includes Date, Purchase Order #, Supplier code (in brackets), Local currency sign and Total value of Purchase order.
Reference: Read-only
The totals that appear at the bottom of a Sales order are described as follows:
- Sub Total: The total of the quotation not including tax
- Tax: The total amount of tax calculated for the quotation
- Total (WYSIWYS): The total amount payable by the customer, including tax
- Supplied: The total value (including tax) of goods already supplied to the customer on this order (regardless of whether or not they have been invoiced)
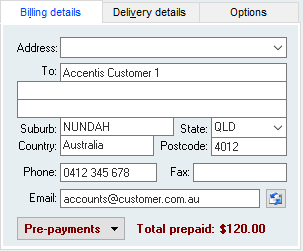
Reference: Select from list
This field allows you to select one of the pre-defined Customer invoice addresses from the list and have it automatically fill in the corresponding address line details. These addresses are set up in the Customers form. You do not have to select one of these pre-defined addresses, you can type directly into the address line boxes instead.
Reference: Address
These are the lines of the address that will be used as the invoice address for any Sales invoice that is generated from a Dispatch for the Sales order. The address lines can be left empty, in which case an address must be typed in at the Sales invoice stage.
Reference: Button
This button prepares an email with the contents of the email field set as the addressee
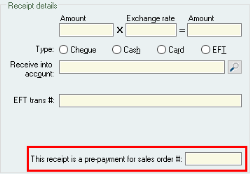
This field appears when pre-payments have been made against the Sales order. This field consists of a pre-payments button, similar to the Dispatch button, which links to and displays the date, receipt number, and amount allocated to each pre-payment against the Sales order.
This field also includes a read-only text field labelled "Total prepaid" which displays the sum of all pre-payments made against the Sales order.
In Accentis, a pre-payment is simply a Receipt record that has the following information filled in:
Note: Any existing pre-payments will not affect the Sales order Totals, but can be allocated to a Sales invoice once one is created for the order.
Pre-payments can be made against a Sales order by going to the Action menu and clicking Receipt money against this order or by hitting Ctrl+R.
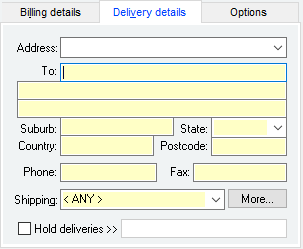
Reference: Select from list
This field allows you to select one of the pre-defined Customer delivery addresses from the list and have it automatically fill in the corresponding address line details. These addresses are set up in the Customers form. If there are no delivery addresses specified for a customer, the delivery address defaults to the business address specified for the customer and the delivery Phone and Fax fields will be filled with the main phone and fax numbers of the customer. Regardless of how the delivery address is filled, you are always able to modify the address or manually enter a new one.
Reference: Select from list, HotEdit
This is the Shipping codes to be used for Shipping that are generated from this Sales order.
Reference: Button
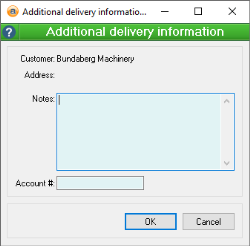
Pressing this button displays the Additional delivery information form which allows you to input extra information about any delivery made when this address is selected in a Sales quotation, Sales order or Sales invoice. It can include additional delivery notes that are unique to this address and an Account # for the customer. Depending on your reports configurations, they can appear on delivery dockets and sales order confirmations.
The additional information can be used to specify particular delivery details. This information can be important for delivery contractors who may not have delivered to this location before, or something about the address has changed, such as new delivery terms.
This form consists of two read-only fields displaying the Customer name and Address, and two fields into which additional delivery information can be input.
Reference: Text
This field is a free-format text box which allows you to detail any notes relevant to the delivery.
Reference: Number
This field allows you to input the customer's account number relating to the selected shipping company. This is used when you want to ensure that the delivery is billed to the customer.
This field will pre-fill with the Customer account # specified in the Shipping company account numbers section of the customer form if one has been specified for the selected Shipping. This field can be edited if required.
Reference: Yes/no
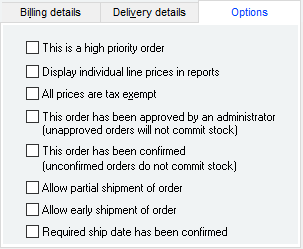
This is a flag that enables you to disallow any Dispatch for the Sales order for some reason. If this field is checked (set to Disallow), then Dispatches cannot be created or edited for the Sales order unless the user has Administrator permissions for Sales Orders. You may want to temporarily suspend Dispatches for a Sales order until the Customer has fulfilled certain obligations or conditions relating to the Sales order.
Reference: Yes/no
Information is under review for a new version and will be updated soon.
Reference: Yes/no
This is a flag indicating if the Sales order line prices should be shown in Sales order printouts. This option only affects the printout of a Sales order or Sales invoice, not what you see on the screen.
When adding a new Sales order, the value of this flag will be determined by the 'Print customer line prices by default ' option in the database setup.
Reference: Yes/no
This option determines whether or not Tax will be calculated for order lines.
- If this option is selected, then no tax will be calculated for any of the order lines regardless of the Tax code associated with that item
- If this option is not selected, then tax will be calculated according to the Tax code associated with the item for each line
This option is initially set based on the GST exempt flag of the Customer type to which the Customer belongs, but can be modified afterwards. For example, an overseas customer would not generally pay any tax and would have this option set by default for every Sales order generated for them.
Once a Sales order has been updated, this option can only be changed by users with Administrator permissions.
Reference: Yes/no
Information is under review for a new version and will be updated soon.
Reference: Yes/no
Information is under review for a new version and will be updated soon.
Reference: Yes/no
Information is under review for a new version and will be updated soon.
Reference: Yes/no
Information is under review for a new version and will be updated soon.
Reference: Yes/no
Information is under review for a new version and will be updated soon.
Reference: Text(30), AutoComplete, QuickList, WYSIWYS
This is the item code identifying the item for the order line. This must represent a valid Item code, but you can type the first few letters of the code and activate the QuickList (by clicking on the button or pressing the QuickList Hot Key. If you select multiple items from the item QuickList, each item code will be entered in consecutive order lines.
The  button displays Sales order line details, which is more detailed information about the Sales order line.
A Sales order line is removed by deleting its item code.
The item code on an existing sales order line cannot be changed when you edit the order if:
- The line has been linked to a complete work order. Click on the
 button to see if it has been linked to a work order
 - The line exists on a dispatch for this Sales order
- The line exists on a sales invoice for this Sales order
Reference: Text(255), Expandable, WYSIWYS
This is the description for the order line. It is initially filled in with the Description of the Item code selected but can be changed to anything you like.
If the line has been invoiced, this field cannot be edited.
If the line has been dispatched (either fully or partially), this field can only be edited by users with Administrator permissions.
If the line has a Work order reference, this field can only b edited by users with Administrator permissions.
Reference: ActionForm
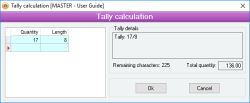
Pressing S while in the Quantity field will open the Tally calculation form.
This form allows you to keep a tally of items that are recorded on a line for Sales order, Sales quotation, Sales invoice and Purchase order.
There is a characters remaining label that keeps track of how many more characters can be added to the description before it will overflow. When you enter too many characters that cause the remaining amount below 0, the label will turn red and the OK button will be disabled. Before the limit reaches 0, you should start a new line.
Longer product descriptions will affect the amount of characters that can be added to the tally form. There is a total character limit of 255, less the number of characters given to the description. Each cell on the tally form has a limit of 15 characters only to prevent an overflow error from occurring when entering too many into a cell.
Last edit 29/01/20
Reference: Select from list
This is the unit of measure of the item that is being sold. The quantity specified is always in terms of this unit, and the number of single items that constitute this unit is displayed below the Unit field (unless that quantity is 1)
To change the Unit of the item, either click the left or right mouse button on the Unit field or press CTRL-U in either the Quantity field or the list price field: this will display a pop-up menu from which you can select a different unit if one exists. Changing the unit for a line will cause the price for the line to be recalculated so that discount structures and volume discounts can be applied.
The units available for selection are those specified in the Units / Pricing field in the Inventory form for the specified item.
Once a Sales order line has had any of the Items dispatched, the Unit field cannot be changed.
Reference: Quantity
This is the quantity of the item's base unit that constitute the Unit selected for the line. If each unit is a single item, then this value will not be displayed on the Sales order form. For example, if you have an item that you sell in units of EACH and BOX and you have setup the units so that 1 BOX is equivalent to 50 EACH, if you set the Unit of the Sales order line to BOX, then the Unit qty will default to 50.
This can be changed for a Sales order individually from the Sales order line details while the form is in Edit or Add mode.
Last edit: 15/01/2026
Reference: Currency
This is the list or standard price per unit for the item and is filled in by default from the list Price of the item but my be changed based on permissions and the value of the 'Allow non-admin users to manually override customer line prices ' option in the database setup.
A discount can be applied to this price to arrive at the Customer’s cost price.
As this field is modified, the Sell price is changed to reflect the new list Price less the Discount.
Reference: Quantity
This is the discount that is taken OFF the list Price to arrive at the Customer’s cost price. This field may be modified based on permissions and the value of the 'Allow non-admin users to manually override customer line prices ' option in the database setup.
As this field is modified, the Sell price is changed to reflect the list Price less the new Discount.
Reference: Currency
This is the price per unit that the Customer is being charged (not including Tax) for the item. This field may be modified based on permissions and the value of the 'Allow non-admin users to manually override customer line prices ' option in the database setup.
If you adjust this price manually, the % Off field will be adjusted accordingly to achieve the correct result based on the list Price of the item.
The price that is placed here by default depends on the Discount structure arrangements for the Customer. The Order line details form (click on the button to see this) displays which method was used to arrive at the sell price.
Reference: Currency
This is the total Customer’s cost for the order line not including Tax. It is equal to Quantity x Sell price. This total is rounded to 2 decimal places.
Reference: Currency, Read-only
This is the tax that is calculated using the Tax code for the Inventory on the Extended price for the order line. This amount is rounded to 2 decimal places. It's possible to set the rate to 0 by right-clicking on the tax column line.
You are only able to do this if:
- The Form state mode is in either New or Edit mode
- The line is valid and not out of range
- The line is able to have it's item changed. If it has linked receives for example, it cannot be changed
Reference: Button
The  button activates the Sales order line details window, in which extra information about an individual Sales order, Dispatch or Sales invoice line can be entered.
The Sales order line details window allows you to enter and view extra information about a specific Sales order, Dispatch or Sales invoice line. For any given line, the details are identical regardless of the calling form. It is activated by clicking on the Sales line details button under the item code text box of a Sales order, Dispatch or Sales invoice line. Fields within the line details window can only be modified in Add or Edit mode.
The top portion of the window displays the order line exactly as it appears on the original Sales order form and this can be modified in the same manner. The bottom portion of the window contains additional information about the order line as follows:
Reference: Yes/no
Information is under review for a new version and will be updated soon.
Reference: Currency
Information is under review for a new version and will be updated soon.
Reference: Select from list, Mandatory, HotEdit, WYSIWYS
This is the warehouse from which this item will be dispatched. This field will pre-fill with the Warehouse assigned to the entire Sales order, however can be changed as required.
This field is only visible if Allow warehouses to be set per line on Sales records has been selected within your Accounts receivable System preferences.
Reference: Select from list, WYSIWYS
This is the Tax code to be used for the Sales order line. This will pre-fill with the tax code assigned to the Item, but can be changed as desired.
If Allow tax codes to be set on Customers and Sales records has been selected within your Accounts receivable System preferences, this field will instead pre-fill with the Tax code assigned to the record.
Reference: Text(64), AutoComplete, QuickList
This is the Job to which the line of the Sales order relates, if any. A Sales order line does not have to have a Job, but if it does then all subsequent actions taken from the Sales order line (e.g. Dispatch, Sales invoice) will be assigned the same Job by default
To display a list of all valid Jobs, click on the button or press the QuickList Hot Key.
Reference: Account Field Type, QuickList
This is the Stock account code for the account that will be updated when the line is included in a Dispatch. The account referenced here is used to copy into the Dispatch line details for the line which can then be modified before the Dispatch is updated.
The Stock account is initially filled with the Stock account specified in the Items information for this item.
If the item specified is a stock item, this account cannot be modified from the default item Stock account.
Reference: Account Field Type, QuickList
This is the account code for the account that will be updated when the line is included in a Sales invoice. The account referenced here is used to copy into the Sales invoice line details for the line which can then be modified before the Invoice is updated.
The Income account is initially filled with the Income account specified in the Items information for this item.
If the Sales order line window was activated from a Dispatch, this field will be read-only.
Reference: Account Field Type, QuickList
This is the Cost of Sales account code for the account that will be updated when the line is included in a Dispatch. The account referenced here is used to copy into the Dispatch line details for the line which can then be modified before the Dispatch is updated.
The Cost of Sales account is initially filled with the Cost of Sales account specified in the Items information for this item.
If the item specified for the line is a stock item, this account cannot be modified from the default item Cost of Sales account.
Reference: List
This is the schedule of delivery.
Reference: Quantity
This field shows the quantity of the items to deliver. Values for this field should be based on the Sales order Quantity (unless the item is a Hire item), not the Unit qty.
Pressing tab after you enter a Date auto-fills the quantity with the quantity that is not yet scheduled (i.e. the amount not already included on other Delivery schedule lines).
If the item is a Hire item, this field can only be set to a value of 1.
Last edit: 15/01/2026
Reference: Menu
This menu option automatically displays the Dispatch form and creates a new Dispatch record containing all Items on the current Sales order that have not yet been dispatched.
The displayed Dispatch form is left in Edit mode so that you can manually make any changes before updating, or you can cancel the Dispatch and not update it at all.
Reference: Menu
Information is under review for a new version and will be updated soon.
Reference: Menu
This menu option provides an easy way of creating a Purchase order for all goods on the current Sales order. When you select this menu item, a Purchase order options screen is displayed, providing the user with several options that control how the items on the Sales order appear on the Purchase order.
Once you have selected the desired options and clicked OK, the Purchase Order form is displayed and a new Purchase order record is begun, containing all relevant items from the current Sales order. If an item was specified multiple times on the Sales order, it will be consolidated onto a single line on the Purchase order and the quantities summed as required. Once the Purchase Order form is displayed, it is left in Edit mode so that you can manually make any changes before updating, or cancel the Purchase Order and if you so desire.
The following options can affect how this works:
Reference: Menu
This menu option provides an easy way of creating Work orders for all the relevant items on the current Sales order. When you select this menu item, and the Sales order has any eligible lines, the Work order options pop-up menuCreate Work orders for all kit itemsReference: Yes/NoWork orders will be created for the total quantity of all kit items on eligible lines excluding the quantities in existing Work orders that are linked to the Sales order line.Last edit: 13/01/2026Create Work orders for required kit itemsReference: Yes/NoWork orders will be created if the quantity on the Sales order exceeds the Qty Available for kit items on eligible lines. The quantity for the Work order will be the difference between the Qty Available and the Quantity on the Sales order.Last edit: 13/01/2026If a kit item contains sub-assemblies, also create Work orders for those sub-assembliesReference: Yes/NoWhen Work orders are created for items with sub-assemblies, Work orders will also be created for those sub-assemblies (kit items listed in the Bill of materials).If a sub-assembly has sub-assemblies, Work orders will also be created for those sub-assemblies. This continues for all sub-assemblies of all sub-assemblies.Last edit: 13/01/2026Create separate Work orders for scheduled deliveriesReference: Yes/NoWhen Work orders are created for items that have a delivery schedule, separate Work orders will be created for each Date listed in the Delivery schedule.Last edit: 13/01/2026Create separate Work orders for each Serial numberReference: Yes/NoWhen Work orders are created for items that have Serial number Item Tracking, separate Work orders will be created for each Serial number used in the Sales order.Last edit: 13/01/2026Save as defaultReference: ButtonStores the currently selected fields for this form. When this form is opened again, it will have the same options selected.This option overrides the Create sub-assemblies by default when generating Work orders for kits on a Sales order system preference for the current user.Last edit: 13/01/2026 will appear in a new window.
If there are no eligible lines, you will receive an error message saying either:
- “Work orders already exist for the full quantities of all kit items on this Sales order. No further action is required.”
- “None of the lines on this sales order are eligible to have work orders created for them.”
When is a line eligible to have a Work order created?
A line is eligible to have a Work order created for it unless any of the below are true:
- It has been flagged as “not released for production”.
- The item code is not a kit/assembly item.
- A work order has been created for the full line quantity.
- The system preference When generating Work orders from a Sales order, honour Make to order flag has made an otherwise eligible item ineligible.
It is possible to allow customised pre-processing commands to flag each line of the Sales order in a way that forces the "Create work order" action to ignore any flagged lines. This feature can be used to mark lines as "Released" or "Ready for production". A customisation is required to manage these flags (the work order number for each line is set to -1 to indicate it is not cleared for production).
If you would like more details about using this feature, contact Accentis Support
Last edit: 13/01/2026
Create Work orders for all kit items
Reference: Yes/No
Work orders will be created for the total quantity of all kit items on eligible lines excluding the quantities in existing Work orders that are linked to the Sales order line.
Last edit: 13/01/2026
Create Work orders for required kit items
Reference: Yes/No
Work orders will be created if the quantity on the Sales order exceeds the Qty Available for kit items on eligible lines. The quantity for the Work order will be the difference between the Qty Available and the Quantity on the Sales order.
Last edit: 13/01/2026
If a kit item contains sub-assemblies, also create Work orders for those sub-assemblies
Reference: Yes/No
When Work orders are created for items with sub-assemblies, Work orders will also be created for those sub-assemblies (kit items listed in the Bill of materials).
If a sub-assembly has sub-assemblies, Work orders will also be created for those sub-assemblies. This continues for all sub-assemblies of all sub-assemblies.
Last edit: 13/01/2026
Create separate Work orders for scheduled deliveries
Reference: Yes/No
When Work orders are created for items that have a delivery schedule, separate Work orders will be created for each Date listed in the Delivery schedule.
Last edit: 13/01/2026
Create separate Work orders for each Serial number
Reference: Yes/No
When Work orders are created for items that have Serial number Item Tracking, separate Work orders will be created for each Serial number used in the Sales order.
Last edit: 13/01/2026
Save as default
Reference: Button
Stores the currently selected fields for this form. When this form is opened again, it will have the same options selected.
This option overrides the Create sub-assemblies by default when generating Work orders for kits on a Sales order system preference for the current user.
Last edit: 13/01/2026
Reference: Menu
This menu option allows you to make a payment against the Sales order. This is most commonly used to create pre-payments for orders that have not yet been invoiced. When a pre-payment has been made, the Receipt details will be displayed in the Pre-payments field of the Sales order. These pre-payments are then stored as credits against the Sales order, and can be applied to a Sales invoice once one has been created for the order.
Once a pre-payment has been made against a Sales order, you can Dispatch the goods as usual, and when you create the Sales invoice, you will receive the following popup box that allows you to allocate the pre-payment to the invoice:
Note: If you use this menu option to create a pre-payment for a Sales order where a corresponding Sales invoice already exists, this new pre-payment will not automatically be allocated to the existing Sales invoice. However, if you Edit and Update the Sales invoice, you will receive the same popup box as above, which will allow you to allocate the pre-payment to the invoice. You do not have to change any data for this to occur, simply click the Edit button, then click the Update button.
Reference: Menu
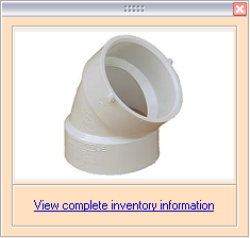
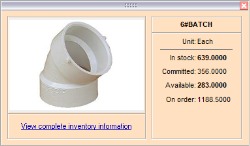
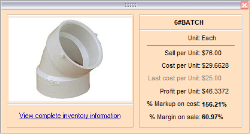
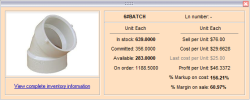
This window will show additional information on the selected stock item based on various settings that can be applied.
The window can display only within the boundaries of the form with which it was opened in, as the relationship is dependant on that form. The following information can be displayed, based on user preferences and system settings:
- Image
- Shortcut to complete Inventory information
- Quantity information
- Costing information
Preferences
Users
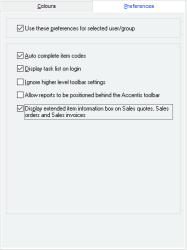
There is a User permission that controls whether or not the Extended item information window will display for each user or group of users.
To configure this setting, go to User > User preferences > Preferences tab > Select user/group > Tick "Use these preferences for selected User / group" > Tick "Display Extended item information window on Sales quotes, Sales orders and Sales invoices.
System
There are two options that control the information that can be displayed within this email. These are:
- Display costing information on the extended item information window
- Display quantity information on the extended item information window
You can access these settings by going to System > Preferences > Accounts receivable tab.
Field definitions
Image
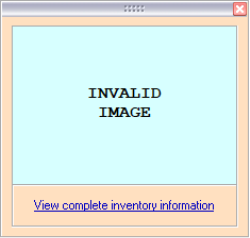
If an item has not had an image saved against it, the image square will display as an invalid image. Any image that is linked will be resized and displayed within the window.
Quantity information
This data selection will display:
- Unit
- In stock
- Committed
- Available
- On order
Costing information
This data selection will display:
- Unit
- Sell per unit
- Cost per unit
- Last cost per unit
- Profit per unit
- % Markup on cost
- % Margin on sale
All information
When all information has been selected to display, it will show in an elongated window with Quantity and Costing data side by side.
Reference: Menu
Information is under review for a new version and will be updated soon.
Reference: Menu
Information is under review for a new version and will be updated soon.
Reference: Menu
Information is under review for a new version and will be updated soon.
Last edit: 17/03/22
